How to Disable Macbook Webcam
How to Disable Macbook Webcam without Hassles
Why on earth would you want to disable the crystal clear Macbook webcam – the point of pride for the device? HD, color balanced and amazingly lifelike, it brings video chat sessions to life and is a boon for telecommuters.
But everything in life tends to have a flipside. And so does the Macbook webcam.
If you have input the query “how to disable Macbook webcam” into your Google search bar, you are already cognizant of the potential threats.
Two Reasons Why You Might Want to Turn Your Macbook Blind
1. First and foremost, it is the fear of being hacked. Yes, miscreants have the know-how and the technical prowess to actually sneak into your system and spy on your activities using your Macbook webcam. And they are able to do so without activating the green LED light. So just because the indicator isn’t on, doesn’t mean your camera isn’t in use. It is a scary prospect but one that too many people have unfortunately had to experience first-hand.
2. The second valid reason might be to protect your children from inappropriate interactions. If your Macbook is the family computer and is used by kids, you may want to disable the webcam so that they can’t participate in Skype sessions or Google Hangouts with strangers.
The Big Complaint of Apple Users
As you already know, there is no simple toggle button in your System Preferences to deactivate the webcam. But that doesn’t mean the problem is without recourse. The solution you choose should depend on how frequently you need to access your camera and get on video chats – either for recreational purposes or as part of your work responsibilities.
We have detailed a number of options that are possible and encourage you to go with the one that takes into account your convenience.
3 Decent Ways to Disable Your Macbook Webcam
1. Use Scotch Tape: Start with the easiest and the simplest way to blind the webcam. Cut a small square of scotch tape or masking tape – something that will be able to properly occlude the lens – and stick it over the webcam. If you don’t want to fiddle around with multiple Macbook settings, this might be your best bet. But when you do peel the tape off, you will be left with a sticky residue that will mar the clarity of the video stream when you eventually use the webcam. Some people opt for Post It notes instead of tape. They stick the adhesive end of the post-it note along the edge of the screen right over the webcam and secure the free sides with clear tape. This doesn’t make as much of a mess but definitely takes more time.
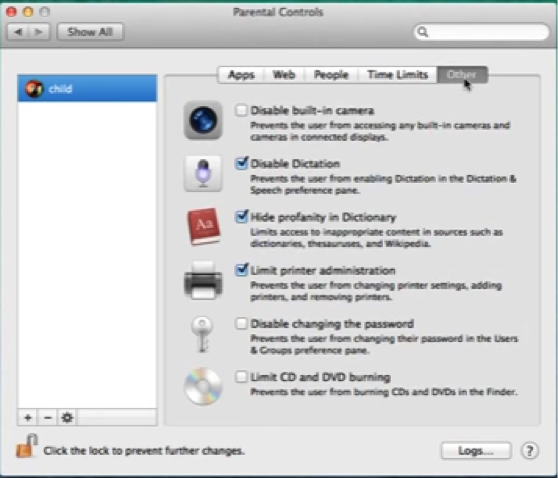
2. Use Parental Controls: Your Macbook is capable of recognizing different profile types. So it gives you the freedom to create a basic profile for your child that you can then customize through the Parental Controls option. While this is great for users with kids, it is also a way to bypass the issue of iSight camera (webcam) activation by hackers and miscreants.
(i) Access Parental Controls from the System Preferences option on the dock
(ii) Choose the option “Create a new user account with parental controls”
(iii) Set up the account with a name of your choice and a unique password. This must be different from the regular password with which you unlock your admin account.
(iv) Activate the profile and click on it in the sidebar to reveal the customization options.
(v) Go over to the tab “Other” and check the “Disable Built in Camera” box

You have now successfully restricted webcam operations to your main user account. Any time you need to join a live video call or use the iSight camera in any way, you must operate from your main account. For the rest of the instances, you can energize the profile with “Parental Controls” and your webcam will automatically stay blind for the session.
3. Disabling through Software Files: A third way out (just in case the two solutions described do not work for you) is to delete the iSight camera file.
(i) Open up the “Computer” modal in your Finder app.
(ii) Click on the folder Macintosh HD. It has all the system files related to your webcam operations.
(iii) Go to “System”, click “Library” and visit the Quicktime folder
(iv) Within this folder, there is a file titled QuickTimeUSBVDCDigitizer.component
(v) Create a backup of this file – if you want to reinstate webcam functionality at a later stage – and delete the one in the Quicktime folder.
And this should effectively deactivate your iSight camera.
A best practice that goes hand in hand with disabling your webcam is ensuring that the microphone is not accepting any inputs from your environment, especially when you do not need to use VoIP to chat with remote colleagues or friends.
A pinch of prevention is better than a pound of cure.
Go ahead and secure your device. Learn how to disable Macbook webcam if you need to.
It’s always better than taking knee jerk action after the deed has been done.
